Table of Contents
- What is Track 2 dump?
- Requirements to Write Track 1 and 2 Dumps With PIN
- How to Write Track 1 and 2 Dumps with PIN
- How to create Track 1 from Track 2 Dumps
Greetings, Hustler! In this tutorial, I’ll demonstrate how to write track 1 and track 2 dumps with PIN today (how to write Dumps). For individuals who are already familiar with track writing in CC, I have also disclosed the steps to create track 1 from track 2. Before we can proceed, as a hustler you need some carding knowledge (read : Carding Tutorial For Beginners).
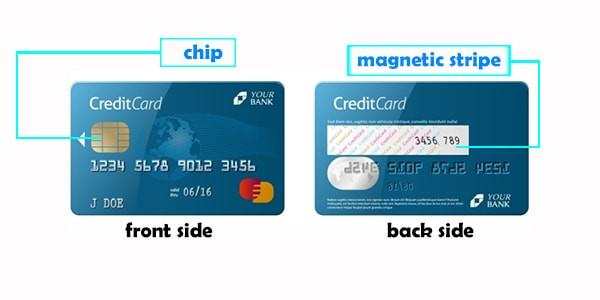
I know you are confused about what track means. Tracks 1, 2, and 3 contain the information on the magnetic stripe of a credit card. Track 1 and track 2 store the bank logs including account number, account name, bank name, etc. ATMs and POS use the details in Tracks 1 and 2 to carry transactions for cashing out or depositing.
Don’t forget to visit our carding shop for carded products and more exclusive deals.“
Track 3 is an optional track for saving additional information. However, top networks such as Visa rarely use it to store user data.
What is Track 2 dump?
In this section, I disclose what track 2 dump means. It is the most important amongst the 3.
I will attempt to break down the structure for you to understand.
Track 2 will look like the digits below:
514563446267380=12202040570004128900“514563446267380” are the digits before the ‘equal sign’ (=) and they represent the primary account number.
If you pick up a credit card or CC details related to the account with this track 2 dump, you would see that the numbers repeat themselves on the card.
For example, the BIN is the first 6 digits of the primary account number. The first 6 digits in my sample track 2 is 514563.
The ‘equal sign’ (=) is only a separator. Now, the first 4 digits (1220) immediately after the ‘equal sign’ (=) represents the YYMM (Expiry Date or Expiry Month/Year). In this regard, 12 in December and 20 the year that ends with 20 (example 2020).
The next 3 digits (204) immediately after the expiry date is called the Service Code.
Now, know that the first digits represent the interchange rules, the second digits represent the authorization processing, and the third digits represent the range of services. The remaining digits are discretionary data that you can still figure out.
Requirements to Write Track 1 and 2 Dumps With PIN
Below are the only requirements to write the dumps with pin tracks with PIN:
EMV Software – EMV Reader Writer Tan ( EMV Software)
EMV stands for Europay, MasterCard, and Visa. It allows you to test the EMV contact and contactless smart cards and it uses an application called EMV.EXE and a testing script.
MCR200
MCR200 Machine allows you to write tracks and read the smart card.
Service Codes
You also need service codes starting with 2 to write.
Smart Card
You also need a smart card, which is different from a traditional credit card.
How to Write Track 1 and 2 Dumps with PIN
In this section, I disclose the steps to write the track dumps with a PIN.
It is not difficult, except you fail to follow my lead.
Below are the steps to write track 1 and track 2 dumps with PIN:
- Launch the EMV.EXE
So, I assume you have installed the software from our site. Now, run the emv.exe as admin and enter the license key. The license key is included in the .txt note file that comes with the software.
- Connect MCR200 to Your Computer
After you complete installations, connect the MCR200 hardware to your computer and select hardware on the EMV Reader Writer Tan ( EMV Software), then got Connect.
- Set Up EMV
After you connect the MCR200, a pop-up comes on. Note, choose your card format and click Check USD Port.
Note, select either MasterCard, Visa, etc. Depending on your card type.
- Generate ARQC, Master Key, and CVV
Click the Generate ARQC button in the EMV software for a set of unique ARQC keys.
Next, click Generate Master Key to generate a set of master keys.
Finally, mark the box that says Generate a New ICVV For Each Transaction.
- Accept EPI MXI Credit Debit and ARPC Key
Now, accept the EPI MXI credit debit and also accept the ARPC Key. Note that you have to store the ARPC Key.
- Next Step
After you accept the options step above, use EMV Tag and ICVV.
Next, click Check ARQC KEY and Check Master Key.
- Set Exp. Date and Enter PIN
In the following step, set the expiry date of the card including the month and year only. You do not need the day because credit cards request month and year of expiration only.
If you have the PIN, enter it at this stage. The PIN is not necessary though, but you cannot use the card on ATM if you do not know the PIN. So, without the PIN, you can use the card only for POS transactions.
I recommend using the card for POS only though.
Enter Track 1 and Track 2
Now, enter track 1 and track 2. Note that track 2 will carry ‘D’ instead of the regular ‘equal sign’ (=). For example,
514563446267380=12202040570004128900 will now be:
514563446267380D12202040570004128900.The difference is that I have replaced the ‘equal sign’ with D.
The reason I am changing the ‘equal sign’ (=) to D is because the EMV software runs in .hex format and not in .txt because both POS and ATM run in .hex.
- Burn the Smart Card
After you enter the track, click Valid. The computer will display a pop-up with the information you have written on the card.
If everything is okay, click Burn Card. It should take about 2 minutes for the computer to burn the data onto the EMV chip of the card.
When the burning process is complete, click Exit to exit the EMV software and remove the card.
Note: Do not remove the card without exiting first.
- Confirm the Card Data
Before you shut down the EMV software, confirm whether the card information is correct.
Restart the software, connect your card to the MCR200, and click Read Card on the interface of the EMV software. Within 1 minute, the EMV software will return the data on the card.
If everything is okay, you may now use the ATM or a POS to cash out. A POS is recommended though.
How to create Track 1 from Track 2 Dumps
In this section, I will teach you how to make track 1 from track 2 dumps. Before you read down to this stage, I believe you came across the section I explained track 2 dumps.
Anyways, our dump info in this article is
514563446267380=12202040570004128900 Chase Bank (USA) credit platinum.
514563446267380=12202040570004128900is our Track 2. Now, I want to show you how to make Track 1 from Track 2.
Bank Name » Chase Bank
Name of Card » John/Pat (first and last name)
Bank Country » USA
Credit or Debit » Credit (in the case of my card)
Card Type » Platinum
Note: If the track carries the ‘equal sign’ (=), it is Track 2. If it carried letter B, it is Track 1 dump.
Below are the steps to make Track 1 from Track 2 dumps:
- Write Out the Card Number
In the case of this tutorial, the card account number is 514563446267380 (the digits before the ‘equal sign’ (=)).
- Change the Equal Sign
Since we are making Track 1 from Track 2, we have to change the ‘equal sign’ (=) to B. You will now have something like:
B514563446267380.- Add Cardholder Name
Next, add the name of the cardholder to the converted Track using a caret sign (^). You will now have the following:
B514563446267380^John/Pat^1220.- Add Service Code
The service code is the 3 digits immediately after the YYMM. In my case, the service code is 204.
When you add it, it should be something like:
B514563446267380^John/Pat^1220204.After adding the Service code, add the remaining codes. The remaining code could be about 10, but in my case, it is more than 10. My remaining code is 0570004128900.
So, when I add the remaining code after the service code, I have the following:
B514563446267380^John/Pat^12202040570004128900.- Add 6 Zeros
After adding the remaining code (typically 10), I add 6 zeros.
My Track 1 becomes
B514563446267380^John/Pat^12202040570004128900000000.Note: My experiment does not work with the Amex card. It works on Visa and MasterCard.